How to Sew a Bucket Hat

What is a Bucket Hat?
A bucket hat is a soft, wide-brimmed hat with a downward-sloping brim. It’s typically made from cotton, denim, or other lightweight fabrics and is perfect for sun protection or adding a trendy touch to your outfit.
Why Sew Your Own Bucket Hat?
- Customization: Choose your favorite fabric and design.
- Cost-Effective: Save money by making your own hat.
- Sustainability: Reduce waste by repurposing old fabrics.
2. Materials Needed

Fabric
Main Fabric: ½ yard of cotton, denim, or canvas.
Lining Fabric: ½ yard of lightweight fabric (optional).
Other Supplies
- Interfacing: To add structure to the hat.
- Sewing Machine: For stitching the pieces together.
- Thread: Matching or contrasting color
- Scissors: For cutting fabric.
- Pins: To hold fabric in place.
- Measuring Tape: For accurate measurements.
- Iron: To press seams and fabric.
- Bucket Hat Pattern: You can find free or paid patterns online or create your own.
3. Step-by-Step Guide to Sew a Bucket Hat

Step 1: Prepare the Pattern
- Download or create a bucket hat pattern.
- Print and cut out the pattern pieces.
- Trace the pattern onto your fabric and interfacing.
Step 2: Cut the Fabric
Cut out the following pieces:

- Top Circle: 1 piece from main fabric and 1 from interfacing.
- Side Band: 1 piece from main fabric and 1 from interfacing.
- Brim: 2 pieces from main fabric and 2 from interfacing.
- Lining (optional): Repeat the above steps with lining fabric.
Step 3: Attach Interfacing
- Iron the interfacing pieces onto the wrong side of the main fabric pieces.
Step 4: Sew the Top and Side Band
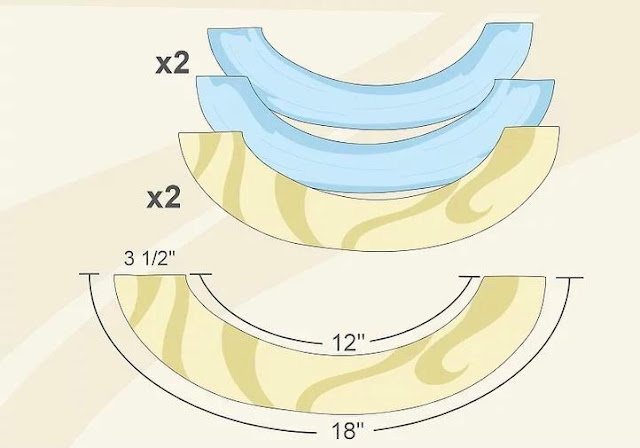

Cut the brim pieces. You’ll need a total of four identical pieces—two from each fabric. Each piece should be 3½ inches (8.89 centimeters) wide. The inner curve should measure 12 inches (30.48 centimeters), and the outer curve should measure 18 inches (45.72 centimeters).
For a wider brim, cut the arches 4½ inches (11.43 centimeters) wide instead.
If you’ve adjusted the size of your circle, ensure the inner curve of the brim matches the length of your modified rectangle.
This step ensures the brim fits perfectly with the rest of your hat.
- Pin the top circle to the side band, right sides together.
- Sew along the edge, leaving a ½-inch seam allowance.
- Clip the curves to reduce bulk and press the seam open.
Step 5: Sew the Brim

- Pin the two brim pieces together, right sides facing.
- Sew along the outer edge, leaving the inner edge open.
- Turn the brim right side out and press.
Step 6: Attach the Brim to the Hat

- Pin the brim to the bottom edge of the side band, right sides together.
- Sew along the edge, leaving a ½-inch seam allowance.
- Press the seam toward the hat.
Step 7: Add the Lining (Optional)

- Repeat Steps 4–6 with the lining fabric.
- Place the lining inside the hat, wrong sides together.
- Hand-stitch the lining to the hat along the brim edge.
Step 8


Assembling the Hat


Cut notches into the seams to reduce bulk and allow the fabric to lay flat. For the top of the hat, make a notch every ¾ inch (1.91 centimeters) along the seam. For the outer edge of the brim, cut a notch every 1 inch (2.54 centimeters). Ensure the notches are just under ½ inch (1.27 centimeters) deep so they don’t cut into the stitching.
Note: You don’t need to cut notches into the seam between the body and brim pieces, as this area doesn’t require the same level of shaping. This step ensures a smooth and professional finish for your hat.
Step 14

Turn the hat right side out through the 4-inch (10.16-centimeter) gap you left earlier.
Gently shape the hat so that one piece is neatly tucked into the other. If needed, use
a skewer or knitting needle to carefully push out the seams along the brim, ensuring crisp
edges and a polished look. This step completes the assembly and prepares the hat for the
final touches.
Step 15
Final the Hat

Tuck and press the gap shut. Fold the raw edges of the gap inward by ½ inch (1.27
centimeters) so they align seamlessly with the rest of the brim. Once tucked, use an iron to press the brim flat, ensuring a smooth and professional finish.
This step closes the opening and gives your hat a clean, polished look.
Step 16

Topstitch around the outer edge of the brim. Sew a line ¼ to ½ inch (0.64 to 1.27
centimeters) away from the edge, ensuring even stitching throughout. This step adds a
decorative touch while securing the layers of fabric for a clean, finished look.
Step 17


No comments:
Post a Comment